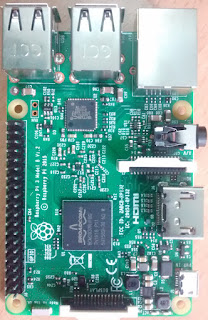
RaspberryPi:
Raspberry Pi is a amazing little computer that fits in the palm of your child's hand also, Also Packed with powerful enough to run your home media center, a VPN, mini server, and a lot more. Before you can do anything awesome, first you need to install an operating system and configure it.Here's how.
What You'll need to Launch Your Raspberry Pi:
- Raspberry Pi
- HDMI Cable : To Connect to HDMI compatible monitor or TV
- USB Keyboard and USB Mouse : Any Standered Usb Keyboard and or Mouse will do the job.
- 3.5 mm audio cable : if you need audio output through your home theare
- Download the latest Raspbian OS (Here)
- A good Quality Power supply 5Volts 2A is recommended or Any Good Power Bank: Most modren smart phone charger is suffecient if you doing light wieght projects.
- 8 GB micro SDcard: A class 4 micro sd card is enough
- SD CardReader
- 2 Softwares to write the Raspibian OS on your memory Card
- SDFormater
- win32DiskImager
Setting Up Your RPi with Basic Operating System (Rasppibian):
You can use the Raspberry Pi for all sorts of different things—some of which may require their own special operating systems—but to start out, it’s a good idea to get acquainted with the Pi by installing Raspbian, a Raspberry Pi-focused version of Linux. Here’s what you need to do.
Step One: Prepare Your SD Card
Before powering the Raspberry You need the Install OS on to your SD card . To do so You must put your SD card into SDcard reader and connecto to you PC/Laptop and then format SD card using SDFormater Software (Becarefull You might Select the Wrong Drive , if you do so all the data in that drive is wiped out).
Once the formating is done then open Win32DiskImager software and Browse the Rasbian Image file which you downloaded earlier. and select Drive(which is pointer to SD Card). There is 2 otions in the drive one is read and the other is write. "read" is to read the sd card and write on the file and "write" is to write the image to the sd card.
now click on "write"(if you select "read" your Image file will be over write by the data in SD car, here sd card having no data so --> image file will be 0 Bytes) so don't do that). now the OS will starts writing on to SD card.
Wait for some time(15 min for mine)
When it finishes, safely eject your SD card and insert it into your Raspberry pi
Step Two:
In step one you successfully write the OS onto your SD card now its time to Power Up your RPi.
Connect usb mouse and keyboard to your RPi and HDMI cable to monitor and your RPi.
Check once all are connected well, then connect the power to RPi.
Now your mini computer start booting up and you can see that in the monitor.
is it asks for user name and password then type the default user name and default password as bellow
user name:pi
password: raspberry
Now you can play with your PRi it having in bult browser,image viewer,document write,...etc .
by default the file system shows only less tha 4 gb even though you use 8GB sd card. there you will face some problem with lowe memory so, first you need to expand the file system so that OS can access all the physical memory on the sd card to do that you need to configure your raspberry.....
to be continued...............


